-
Download the USB DRIVER and ADB Tool from this link.
-
Extract and copy the folder to your desktop
-
Make sure you have installed the USB Drivers for Android Phone.
-
Connect your phone using USB Cable to PC
-
Open the Extracted Folder on Your Desktop
-
Now firstly Double Click STEP-1.BAT file. It should show you 0[auto] as result in CMD window. Press any key to close CMD.
-
Now Double Click STEP-2.BAT file. Press any key to close CMD. That’s it. Now SD Card is set as Default installation location.
-
To verify, double click on STEP-1.BAT file. It should show you 2[external].
Month: March 2014
Block Ads in Android Phone — even in Apps
To serve you better and ad-less internet, ADBLOCK PLUS is making efforts. ADBLOCK PLUS is available as extension to Mozilla Firefox, Google Chrome and Internet Explorer. It blocks almost every ad on the webpage. If some ads are not being blocked, then just right click on the ad and block the ad. In future, you will not see ads from that ad server again.
Now ADBLOCK PLUS has reached to ANDROID. But its not available through Google Play Store. Google is not listing it for obvious reasons. It blocks Google Ads too. One step ahead, it blocks ADS in android applications too. Now you can run Free Apps without Ads.
To install ADBLOCK PLUS on your phone, you have to make changes to settings of your phone.
Go to Settings –>Security –>Unknown Sources (It should be ticked).
Now visit on your Mobile’s Browser : – https://adblockplus.org/en/android-install
and download and install on your mobile phone.
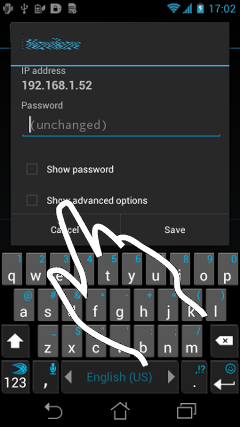
Once, App is installed. Now you have to set up Proxy Settings for Wifi Network with which you are connected. Here are the screenshots for setting Proxy in Android version 4.0 upwards.
Run Settings application. Select Wi-Fi. The list of available Wi-Fi networks will open:
Connect to the desired network (access point) if not already. Long press on connected network, context menu will appear. Select Modify network config:
localhost and Port to 2020Free WordPress Hosting with Premium Features – www.theinbox.in
WordPress.com is the official website where you can start your blog for free. But there are few restrictions like you can not install PLUGINS which are the most important part of WordPress or you can install only few THEMEs.
So here is another good OPTION for WordPress Lovers.
![]() is new WordPress Hosting Service which allows anyone to start with WordPress Blog for Free. Just sign up for free. You can have your blog instantly.
is new WordPress Hosting Service which allows anyone to start with WordPress Blog for Free. Just sign up for free. You can have your blog instantly.
Besides WordPress, you have choice of installing Joomla, OsCommerce etc Content Management Systems. Again free of Cost installation.
Additional Features which are provided are as follows: –
- 5 GB Disk Space
- 50 GB Bandwidth
- 5 Mysql Databases
- 5 Addon Domains
- 5 Sub Domains
- 5 Parked Domains
- Web Email Service
- Ticketing Support System
- and many more features.
If you want to go for premium services, you can start with just $0.99 per month.


